SOP: General Methods
This page covers general methods for setting up an infra-red (IR) video system for 24h recording of mouse home cage behavior. As mice are nocturnal, IR video is essential. However, IR light is very difficult to work with, it reflects, refracts, and diffuses differently from visible light. As a result, apparently white objects may appear black in IR, and many marker pens do not actually show up as black in IR light. Similarly, lenses focus IR and visible light slightly differently, so a camera focused in visible light will be out of focus in IR light. Finally, IR light does not diffuse and scatter as readily as visible light, so it is hard to achieve a diffused, non-glared, even illumination of a cage - simply pointing a camera and illuminator at a cage will result in a tiny spotlight of flooded illumination in a largely dark cage, and the camera will likely be blinded by glare from the cage sides and any metal parts. This SOP is the result of years of tweaking and perfecting IR video for mice to resolve these and other problems.
The video itself must obviously be recorded. Although time-lapse video is an option, the bandwidth and quality of VCR equipment is extremely low, and playback and observation of these VCR tapes is extremely time-consuming. Accordingly, we strongly recommend using an MPEG-4 based multiple channel DVR system. Cheaper, earlier generation MPEG-2 based systems should be avoided (the MPEG-2 standard provides poor compression, and unpredictably slow or high-speed playback and search). The most efficient systems and cost effective systems are PC-based security systems (our lab typically uses GeoVision based systems) - we regularly record 5 days of 24h video at DVD quality from 16 cameras and archive this on a 250GB portable drive.
List of Materials
- Basic metal wire rack measuring approximately 79 inches high, 47 inches wide across the front and back, and 17.5 inches wide on the sides
- White board
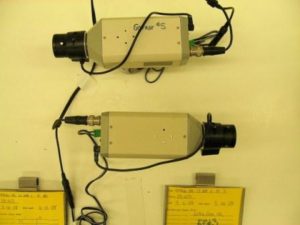
- Infrared Cameras
- Illuminators
- VCR or DVR.
- Tape, double sided velcro, and zip ties
White Board
The white board should have a non-glossy matte finish, which aids diffusing the IR light. In this way, the light evenly illuminates the cage from all sides and not just as a spotlight from the illuminator. In addition, the white board helps avoid disruptions to the mice from outside sources such as husbandry staff and other researchers. It also functions to eliminate background distractions in order for the observer to remain focused on the mice.
- White board is set up across the sides, front, back, and bottom of the rack.
- Cut the white board into five pieces per shelf.
- Cut the sides so that they measure approximately 14 inches high and 17.5 inches wide.
- Cut the bottom, front, and back so that they measure approximately 17 inches high and 48 inches wide.
Rack Set-up
- Place one shelf approximately 25 inches above the floor and place the other shelf approximately 25 inches above it. We recommend these types of racks because they are adjustable and equipment can be easily bolted to them.
- Line the shelves with measured and cut white board so that there are no gaps between the boards.
- Place the white board for the bottom onto the shelf. The edges may need to be trimmed to fit around the supports.
- Place the pre-cut white board for the sides on the inside of the supports and secure them to the supports with tape. Do the same for the back except secure this board to the outside of the supports with tape.
- When securing the board for the front, it is critical to ensure access to the area where the cameras and cages will be set-up. This can be accomplished with double sided velcro and zip ties. At the bottom of the board, punch approximately 3-4 holes toward the ends and middle of the board. These will be used to secure the board to the rack and create a hinge for the board to open down. Place a zip tie through each hole and secure it to the ledge of the shelf. Pull the zip ties lose enough so that the board opens down easily without ripping the board. Place the double sided velcro at the top corner of the board and the other side directly on the supports so that it lines up with the board. This will allow for the front to be opened easily.
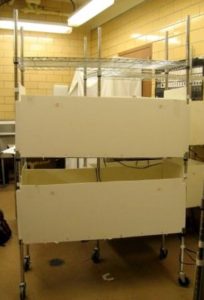
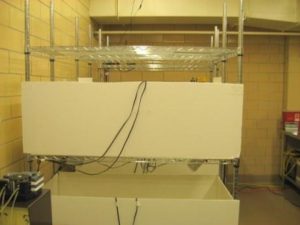
The above picture is an illustration of a set up rack.
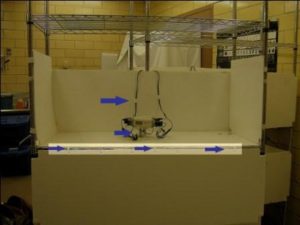
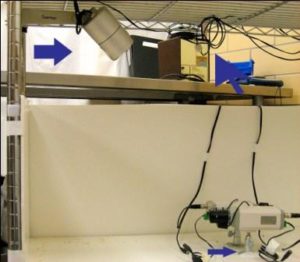
The above picture is the basic white board and camera set-up. The highlighted portion and arrows illustrate where to punch holes in the board and insert zip ties. The top arrow illustrates how the camera wires can be taped and run over the back of the board. The bottom arrow illustrates where the cameras should be secured to the bottom white board.
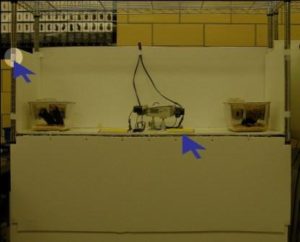
The above picture illustrates the basic set-up with the cages placed inside. The arrows point to the placement of double sided velcro and the cage cards, which should be removed prior to recording.
Camera Set-up
Place the cameras in the center of the shelf of the rack, such that one faces each direction. Secure the cameras to the white board to ensure they remain upright. The camera wires can be routed over the back of the rack and taped to the back of the white board. Adjust the camera so that the picture is clear. In addition, after illuminators are set up, focus the cameras with the room lights off, because the focal lengths of IR and regular light differ.
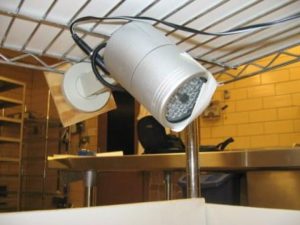
The above picture is an aerial view of the camera set-up.
The above photo illustrates the camera wires hung over and taped to the back white board.
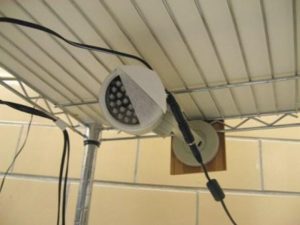
Illuminator Set-up
Arrange the illuminators at a 45 degree angle to the camera, so that light from the illuminator does not bounce back directly at the camera, reflect off the cage side, or reflect off metal parts. The illuminator for one cage is typically mounted on the opposite side of the rack. Illuminators can be secured to the rack using wood board and screws. If there is too much glare in the picture, a tissue paper screen can be placed in front of the IR but not directly touching the IR. Please note use extreme caution if placing a screen in front of the IR, as lights can become very hot and if not done properly this may be a fire hazard. We recommend turning the lights off and viewing the camera pictures, to adjust the luminosity and ensure that the night recordings will not be too bleached. Some cameras can be highly sensitive to the illuminators and will flash if the illuminators are not adjusted properly.
The picture above is the basic illuminator set-up. The arrows emphasize illuminator position, wire position, and a closer look at where cameras are secured to the white board.
In the above two pictures are mounted illuminators. Notice the placing of the wood board for mounting and the white cotton screen placed over, but not directly on, the illuminator for light diffusion (We again would like to stress that this must be done using extreme caution for fire safety purposes).
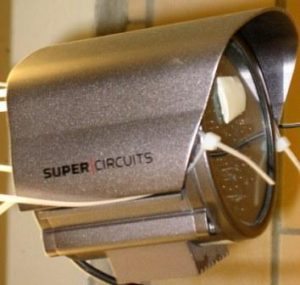
The above picture is another type of illuminator that may be used for the top level cages, as these tend to be stronger.